14 Gel electrophoresis to detect GMO crops
Today you’ll prepare and conduct gel electrophoresis to identify which samples showed amplification with your GMO (35S promoter) and housekeeping gene (Tubulin) primers. The expected sizes of our PCR amplicons are small (<200 base pairs) so we will pour 2.4% agarose gels. Small DNA fragments need higher concentrations of agarose to separate from each other on a gel.
- Get a gel tray (a cast) and close the open ends with masking tape.
- Make sure that your tape is smooth and tight to avoid agarose spilling onto the lab benches.
- Place a comb in the slots located closest to the end of the cast.
- SLOWLY and CAREFULLY pour hot agar into the cast until the level of agar is 3/4 of the way up the teeth of the comb.
- Let the gel sit and cool until cloudy and firm (~20 minutes).
- After the gel has cooled, remove the tape and gently remove the comb. Notice the wells that are created by the comb.
- Place the gel and gel tray into the gel box and slowly pour in enough TAE buffer to just fully cover the gel. The surface of the gel should look completely smooth. Check that the wells are entirely submerged.
- Use the P10 pipette to load DNA samples into the gel in the following order. You do NOT need to add gel loading dye to your samples, since the PCR master mix and ladder already contain loading dye. Go slowly and use one hand to stabilize the pipette while you press the plunger with the other hand.
- Lane 1: 10 μL DNA ladder
- Lane 2: 10 μL PCR product from Test Food 1 (tube T1).
- Lane 3: 10 μL PCR product from Test Food 2 (tube T2).
- Lane 4: 10 μL PCR product from ‘GMO Banana’ (Tube G).
- Lane 5: 10 μL PCR product from ‘non-GMO Banana’ (Tube W).
- Place the lid on the gel box and connect to the power supply box. Make sure you properly match up the red and black connections. The gel will ‘run to red’ which means your samples migrate towards the red, positive electrode.
- Turn on the power supply box and set the voltage to 100 V. Run your gel for 60 minutes. After the gels run, TURN OFF THE POWER SOURCE before removing the gel box lid.
- Using gloves, remove the lid from the gel box, carefully lift the gel and its tray, and then drain off excess buffer. Put your gel tray onto a paper towel.
- Slide the gel off its tray onto the black light box to view. Take a photograph with your phone.
| Note: There is electricity flowing through buffer and gel box. Do not touch the buffer, power connectors, or leads while connected to the controller. |
Viewing and Interpreting the Gel
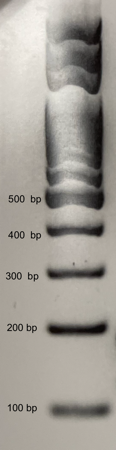
- Draw the results of your team’s gel below or tape in an image from your camera. Using the DNA ladder shown below for reference, label the sizes of each DNA band you observe in your two test foods and the two control reactions.
- To interpret your results, remember that all DNA samples were subjected to PCR for two separate targets:
- The reference ladder below shows you the size of DNA fragments contained in the DNA ladder. Use this reference to interpret the size of your DNA amplicons.
- The Tubulin gene is present in all plants and is used as an internal positive control for the quality of the DNA extraction. All successful DNA extractions followed by good PCR should show a 150 or 180 base pair band corresponding to the tubulin gene.
- The CaMV 35S Promoter is present in the majority of genetically engineered crops. We expect to see a 125 base pair band corresponding to the CaMV 35S promoter. Absence or presence of the 125 bp band in Test Foods 1 and 2 serves to reveal their GMO status
- If you see very small bands on your gel (smaller than 100 base pairs) these are “primer dimers” that form from primers sticking to each other and initiating amplification of each other. These primer dimers are not evidence of amplifying Tubulin or the 35S promoter.