
11 Genetic engineering and bacterial transformation
Introduction
Genetic engineering is a hot topic around the world these days. From stem cell research to genetically modified foods, we are constantly bombarded with ideas and opinions from every direction on this topic. Some groups protest the inclusion of genetically modified organisms (GMOs) in food and agriculture. Currently, there are ongoing court battles to determine whether GMOs should be labeled as such when sold for human consumption. Further court cases include freedom of public information on what modifications are being done by whom, to what, and for what purpose.
But what does it really mean when biologists use terms like genetic engineering, genetically modified, or transgenic organisms? What purpose has genetic engineering served within biology? Who does the actual modification and how?
That’s what this week’s lab is about: the who and how of genetic engineering. Before we get to this week’s procedure, let’s explore a bit about what genetic engineering is and what it means to a biologist.
Genetic Engineering and GMOs
The term genetic engineering conjures up many different images to different people. Some picture sheep being cloned in the lab, or goats that produce spider silk proteins in their milk. Some envision fixing damaged genes in diseased cells or producing needed medicines and vaccines to save countless lives. Still others visualize creating crops capable of growing in harsh, formerly inaccessible climates, with added nutrition that can feed millions of people worldwide.
In fact, all of these images are correct; all of these things have been accomplished through manipulation of existing genes or by adding new genes to existing organisms to yield genetically modified organisms. Chances are you have the products of these experiments in your house, such as corn, rice, soybeans, or cotton and all of their byproducts. Many common agricultural crops contain one or many genes introduced from the bacterium Bacillus thuringiensis (Bt). These genes encode crystalline proteins that are toxic to many plant pests but are harmless to vertebrates. Arthropod herbivores that would normally need to be controlled through application of chemical herbicides are killed when they feed on these crops. Thus introduction of Bt genes to crops has lowered the use of more poisonous insecticides within agriculture.
GMOs in Medicine
Genetically modified organisms have contributed immense advances to drug therapies and vaccine development. Many diseases are caused by defective genes. For example, one cause of diabetes is a defective gene that should normally produce insulin. Insulin is a protein that helps to regulate blood sugar levels. When the insulin gene is defective, individuals cannot regulate their blood sugar and are subject to dietary restraints and health deterioration. To alleviate some of these symptoms, many with this disease inject insulin to replace what is missing. Historically, insulin was harvested from cattle or pigs and used to treat humans, but since bovine and swine insulin is not quite the same as human insulin, this sometimes caused additional side effects. In 1978, a team of researchers inserted a functional human insulin gene into some Escherichia coli (E. coli) bacteria, creating transgenic bacteria that produced human insulin. Now, virtually all of the insulin used by diabetics worldwide is harvested from transgenic bacteria. Genetic engineering is also used to make vaccines and medicines that have saved innumerable lives using transgenic bacteria, yeasts, and even mammals to produce the necessary components.
GMOs in Controversy
Genetically modified organisms are certainly not without their potential problems. Raising concerns among ecologists are the possibilities of ingression of modified genomes into native species. Cross pollination between modified and unmodified plants may produce unwanted occurrence of modified genes and transgenic plants outside of agricultural settings. Evolution of resistance within insect targets of Bt modified crops has been documented, and concern over hybridization of transgenic vertebrates with endangered species is one concern. While genetic engineering has led to many improvements in agriculture and medicine, it is still a new science and the long term effects and outcomes are largely unknown.
GMOs in Lab
Regardless of the specific organisms used or the desired end results, the practice of genetic engineering comprises four main processes. First, isolate the gene of interest. Second, create a vector to carry that gene into a host organism. Third, introduce the vector to the host. And lastly, screen the hosts for those that contain the gene of interest.
Step 1: Isolate the gene of interest.
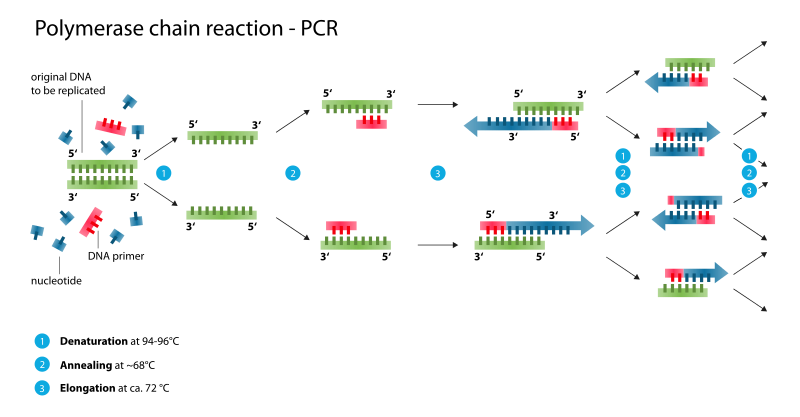
A technique known as Polymerase Chain Reaction (PCR) is used to produce many copies of a gene sequence of interest. You’ll get a chance to perform PCR in the lab soon. For now, you just need to know PCR is DNA replication in the lab. By cyclically raising and lowering the temperature of a solution, over a billion copies of a DNA fragment can be generated in a couple hours.
In order to prepare a target gene to be inserted into a vector, genetic engineers make use of a key evolutionary trait within the genomes of all living organisms. Dispersed throughout our genome, we have palindromic nucleotide sequences. These are nucleotide sequences that are the same forward on one DNA strand as in the opposite direction on the complimentary strand. For example, in the following sequence the nucleotides in bold create a palindromic sequence. The sequence reads the same left to right in the top strand as it does right to left in the bottom, complimentary strand.

Many of these sequences are the result of genetic insertions from viruses that have accumulated and been passed down generation after generation over millennia. Restriction endonucleases (AKA: restriction enzymes) are enzymes that recognize and cut DNA at specific palindromic sequences. Restriction enzymes were first identified in E. coli bacteria and function as viral defense proteins, recognizing and cutting foreign DNA at restriction sites, and thus rendering the viral DNA inert. Since their discovery, over 3000 restriction enzymes have been identified, about 600 of which are commercially available for lab use.
When restriction enzymes cut double stranded DNA, they do not cut straight across both strands. Instead, they cut across each strand at a slight offset that leaves unpaired nucleotides on each strand. These free nucleotides form “sticky ends” that can be paired with free nucleotides from any other DNA molecule cut with the same restriction enzyme. By cutting DNA from different sources with the same restriction enzyme, these molecules can be joined to form recombinant DNA, a mixture of genes from different sources.
Step 2: Create a vector.
A vector is the means of delivery to get the gene of interest into the host organism. Vectors can be as simple as a circular piece of DNA called a plasmid that is taken up by the host cell, or as complex as creating a virus specifically to “infect” an organism with the target DNA. For our purposes, we will focus on the use of a plasmid as a vector.
Plasmids are small, circular pieces of DNA that can be replicated separately from the chromosome. Many plasmids exist within bacteria and often carry genes that confer resistance to certain antibiotics. Plasmids that have been removed from one bacterium can be readily taken in by another bacterium. By inserting our gene of interest into a plasmid, we can thus use the plasmid to introduce our target gene into a host cell. But first, we need to get our gene into that pesky plasmid.
In order to accomplish this, we can cut the plasmid with the same restriction enzyme that we used to harvest our gene from the original source DNA. This way, the sticky ends of the target will match the sticky ends created by cleaving the plasmid. We can mix our purified DNA fragments from step 1 with the cleaved plasmids and some of these will join together. Thus, we have just created a vector plasmid that will carry our target gene into a bacterial cell.
Step 3: Introduce the vector to the host cells.
Now that we have a vector to get our target gene into our host cell, we need to give the vector access to the host cells. Depending on the particular vector, this could mean exposing a culture of bacteria to a medium containing a vector virus or even shooting the target DNA sequence into a cell using a gene gun (literally fires DNA into a cell right through the cell membrane). In our scenario, we have created plasmids that will carry our target gene into our host cells. We can take our host cells and suspend them in a liquid containing our plasmid and calcium chloride. The calcium chloride coats the cell membranes with Ca2+ ions and causes the negatively charged DNA plasmids to be attracted to the cells. By briefly heating the bacteria, pores in the cell membrane are opened and the plasmids can diffuse into the cells.
Step 4: Screening the host cells for the target gene.
When we introduce the vector to the cells, we are relying on diffusion to get the plasmid into the cells. Some cells may have taken in one or more vector plasmids, and others may not have taken in any. Thus, we have three possible outcomes so far. We could have cells that have no new DNA, cells with the plasmid vector but not the target gene, and cells that have the target gene in them. We now need to screen these cells for those that contain our target gene of interest.
Screening the host cells involves using the specific genomic characteristics of the plasmid vector. Plasmids used in genetic engineering often contain a gene that confers antibiotic resistance to the host cell. By exposing the host cells to that particular antibiotic, only those cells that contain the plasmid will survive and reproduce. Thus, we can quickly screen out those cells that did not take up the plasmid vector.
Further screening will allow us to identify which of the remaining bacteria actually got the gene of interest. We could incubate the bacterial colonies with a fluorescently or radioactively labeled probe that will bind with the known target gene sequence. We could also simply look for the production of the identifying protein, like insulin, or in our particular lab, a protein that glows under UV light.
Experiment 1: Bacterial Transformation
It would be very cool to be able to go through all of these steps in order to isolate a gene, create a vector, and use it to introduce a new gene to an organism. But our lab times are limited, so we can’t do everything. We can, however, complete some of these steps and create our own GMO critters right here in lab! And that’s what we’re going to do. Using a manufactured plasmid as a vector, we are going to transform some E. coli bacteria into fluorescent little buggers that glow under a black light.
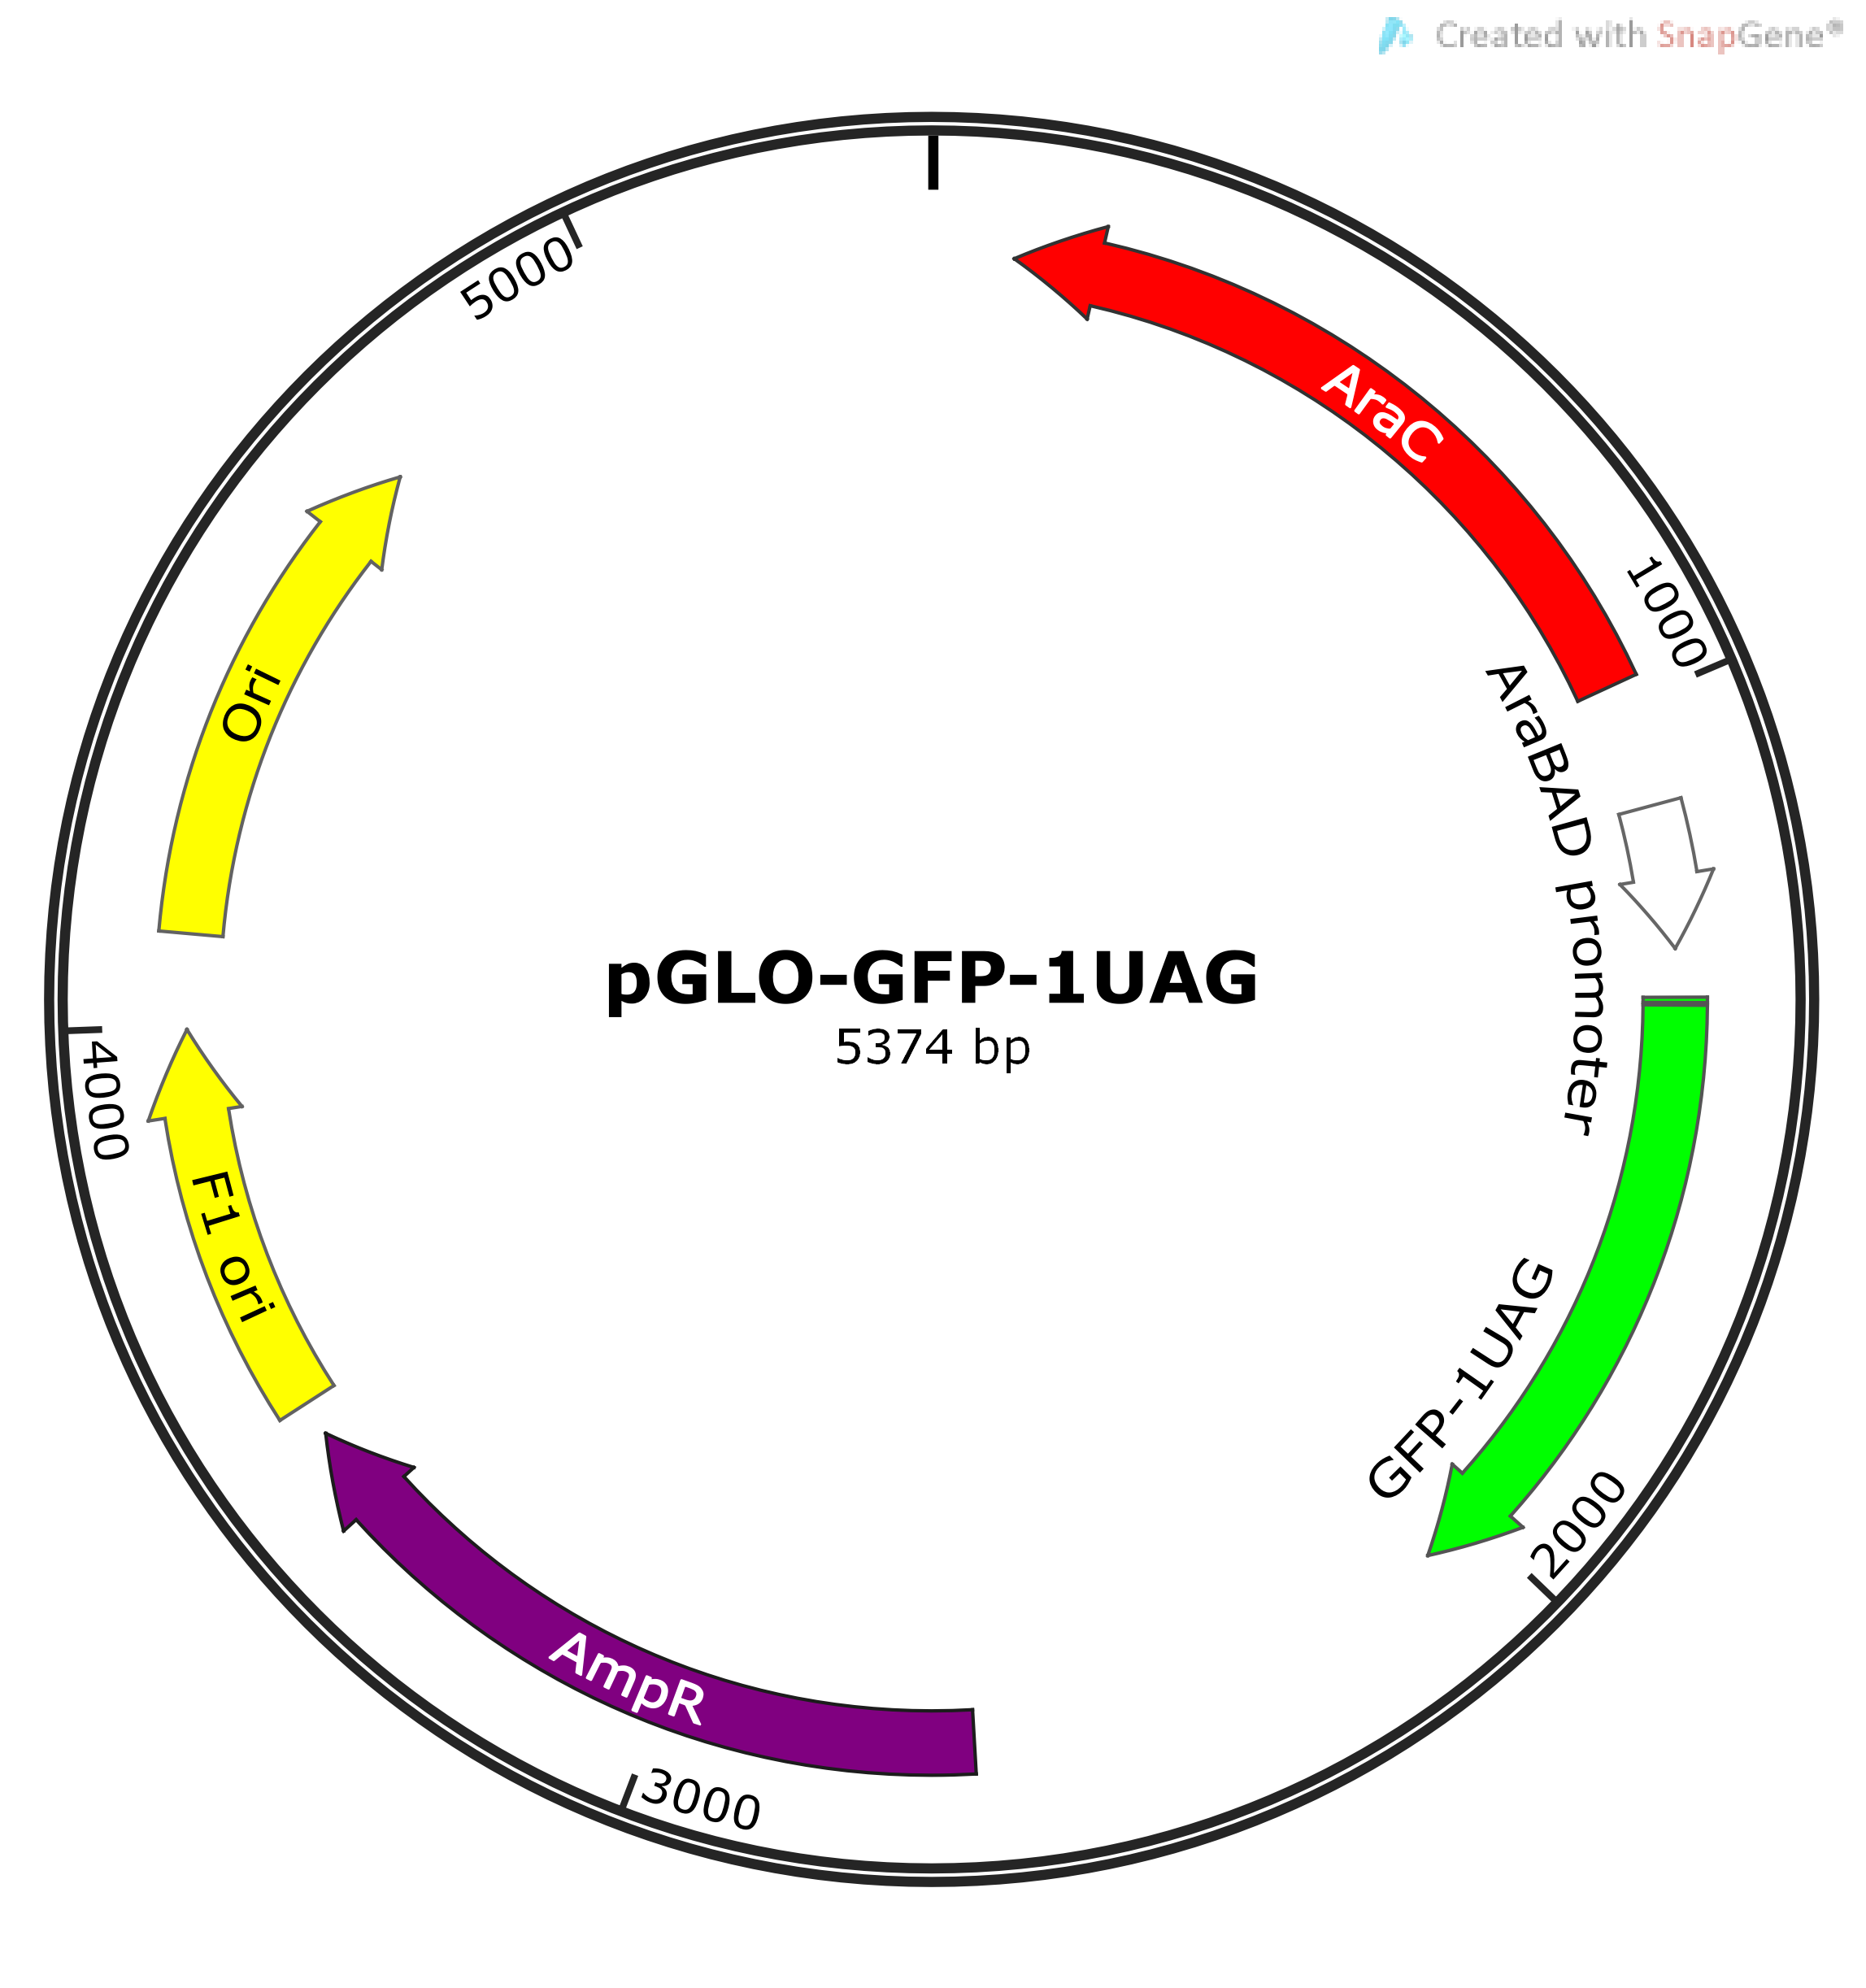
The plasmid we are going to use carries a gene, isolated from a jellyfish, that produces a protein called Green Fluorescent Protein (GFP). This plasmid has been engineered so that the GFP gene is ONLY turned on when the cells containing this plasmid are grown in the presence of a sugar called arabinose. Arabinose initiates the binding of RNA polymerase, which promotes transcription of GFP and leads to green glowing cells. Transformed cells will appear white when grown in medium that lacks arabinose. The plasmid also contains a gene that confers resistance to the antibiotic ampicillin. So, we will use ampicillin to screen our transformed bacteria for those that receive the plasmid vector and use a blacklight to identify which colonies express the GFP gene and glow green!
Understanding the Experiment
In this lab exercise, we are creating four treatment combinations. Each agar plate will have some combination of E. coli with or without plasmids, and an agar medium that will or won’t contain ampicillin. We’ll test plates that don’t contain arabinose, and plates that contain the arabinose necessary to activate GFP transcription.
To understand this experiment, we need to understand why each plate is being created. What is the purpose of each treatment combination?

Procedure
- Each group will obtain two Eppendorf tubes and label one P-, and the other P+. These will serve as your transformation tubes. The P+ tube will receive the plasmid, and the P- tube will serve as a non-transformed control treatment.
- Use a micropipette to add 0.25 mL (250 μL) of cold CaCl2 solution to each transformation tube. Place the tubes on ice.
- Use a sterile loop to gather a small amount of E. coli from an agar plate. Use the loop to pick up half of a patch of cells. You’ll use the other half of the patch for your second tube.
- Immerse the loop into the CaCl2 solution in one tube. Spin the loop between your index finger and thumb until the colonies are dispersed (there are no floating chunks). Place the tube back on ice.
- Using a new sterile loop, repeat steps 3-4 for your second transformation tube.
- Use a micropipette to add 10 μL of plasmid solution to the P+ transformation tube, tap the tube gently several times to mix the solution and return the tube to ice for 10 minutes. Do not add plasmid to the P- tube.
- Obtain and label four agar plates. Write on the outside edge of the bottom of the plate: group name, lab section, and treatment combination. Do not write on the lid: lids can fall off.
- Obtain one LB plate without ampicillin and label it P-. This is your AMP(-) plate.
- Obtain two agar plates that contain ampicillin (LB/AMP) and label them as AMP+.
- Label one of the AMP+ plates as P+ and the other AMP+ plate as P-.
- Obtain one LB/AMP+/arabinose(+) plate and label it P+
- Heat-shock both transformation tubes by immersing them for exactly 50 seconds in a 42 °C water bath. This will heat shock the bacteria and allow for DNA to enter the cells.
- When the 50 s has passed, immediately place the transformation tubes into ice for 2 minutes.
- Move your transformation tubes to your benchtop. Use a micropipette to add 0.25 mL (250 μL) of LB (Luria nutrient broth) to both tubes, and then incubate the transformation for 10 minutes at room temperature.
- Gently flick the tube with your fingers to mix and resuspend the bacterial. Use a micropipette to transfer 0.1 mL (100 μL) of transformation solution from each tube onto the appropriate plates. Be sure to match the P+ and P- solutions to the labeled agar plates.
- Use the glass rod to spread the transformation solution around the surface of each agar plate and replace the lid. Be sure to sterilize the rod between treatments following the instructions below:
- Before and after spreading each treatment solution, dip the glass rod into the coplin jar containing ethanol. This will sterilize the rod.
- Remove the rod from the ethanol, then light the rod to burn off the excess alcohol. Allow a few seconds to cool before using the rod again.
- Allow the plates to dry for 5 minutes with the lids closed.
- Turn the plates upside down and tape together using masking tape. Your lab instructor will incubate the plates at 37 °C for 24 hours and then transfer the plates to a refrigerator. We will look at our results at the beginning of our next lab.
- Wash your hands before leaving lab
Record your observations from each plate in the table found in your Student Workbook.
