
3 Macromolecules
Living things are composed of four major groups of biomolecules: carbohydrates, lipids, proteins, and nucleic acids. Each of these types of organic molecules contain carbon, hydrogen, and oxygen, yet each type of molecule plays a unique role within an organism and within a cell. In this week’s lab, we’ll review the function and structure of macromolecules and then perform assays to identify these macromolecules in different samples. By developing effective assays, we’ll be able to identify four unknown ‘dairy’ samples based on their unique composition of macromolecules. Let’s begin by diving into a review of the function and structure of macromolecules.
CARBOHYDRATES
Carbohydrates are generally those molecules that have the empirical molecular formula of CnH2nOn which may also be written as (CH2O)n , though there are exceptions. Carbohydrates usually have the ending –ose, such as seen in sucrose, lactose, and glucose. Approximately half of all organic matter on earth is made up of carbohydrates. The carbon bonds within the carbohydrate, when broken down, yield energy and most living organisms have the means to break them down. Thus, carbohydrates are an energy source for most life forms.
Saccharide (or sugar) is the term used to describe the structural unit for carbohydrates. If a carbohydrate has only one structural unit, it is referred to as a monosaccharide. If the carbohydrate is composed of two saccharide units it is called a disaccharide and it is called a polysaccharide if it is composed of many saccharides. Monosaccharides (or simple sugars) are the “building blocks” of all the other carbohydrates and consist of a single unit and cannot be broken down into simpler sugars. A monosaccharide is usually composed of 3 to 7 carbon atoms. Common 6-carbon monosaccharides (or hexoses) include glucose and fructose.
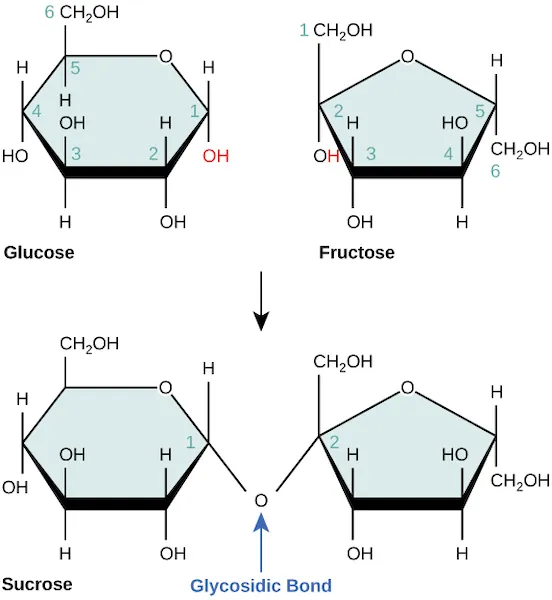
Disaccharides may be formed when two monosaccharides are joined together with the elimination of a water molecule, a dehydration synthesis or condensation reaction. For example, sucrose (common table sugar) is formed when a bond is formed between glucose and fructose, with the elimination of a water molecule. The reverse reaction, hydrolysis, involves the addition of a water molecule, which breaks the disaccharide back down into the two monosaccharides, glucose and fructose.
Polysaccharides are formed from the combining of many monosaccharides into long chains via dehydration reactions. Polysaccharides are a major storage form of carbohydrates, and include starch in plants and glycogen in animals. Polysaccharides may be broken down into their simpler monosaccharide “building blocks” by hydrolysis. Starch, the storage molecule in plants, is not readily soluble in water and this makes it a good way to store energy reserves within the plant cell. Animals store up energy in the polysaccharide glycogen, which is stored in the liver and in skeletal muscle cells.
LIPIDS
Lipids are complex organic molecules that tend to be insoluble in water (hydrophobic) because they are non-polar. Lipids tend to be grouped in 4 groups: neutral fats, phospholipids, steroids, and other lipoid substances.
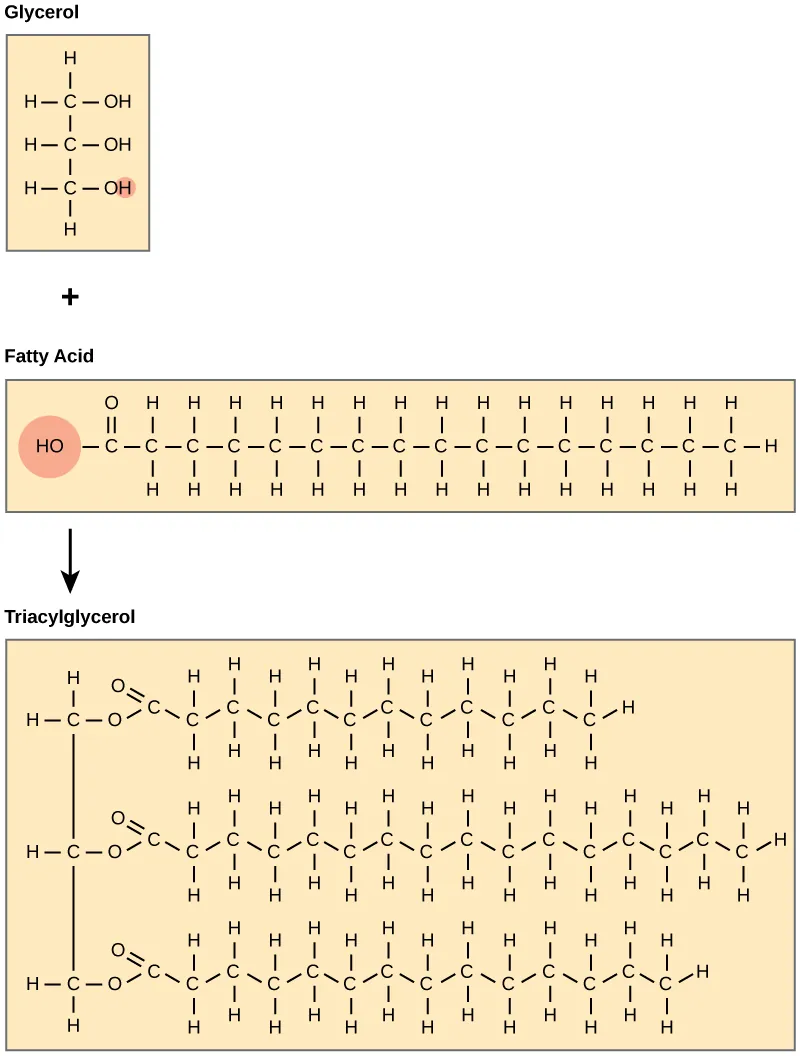
Neutral lipids, also called triglycerides, are composed of 2 basic building blocks: glycerol and 3 fatty acids. Because the neutral fats are insoluble in water they provide an excellent means for the body to store high-energy molecules.
Phospholipids are similar to the neutral lipids except that they contain a phosphate group in place of one of the fatty acid chains. The phosphate group is polar (and hydrophilic), providing the phospholipids with dual chemical properties (they are both hydrophilic and hydrophobic). Phospholipids are a major structural molecule of cell membranes. The phospholipids of the cell’s membrane arrange themselves into a bilayer of phospholipids; the hydrophilic phosphate heads of one layer orient themselves towards the inside of the cell (where there is a lot of water) and the second layer orients its phosphate heads closest to the outside of the cell (where there is a lot of water), thus, sandwiching the nonpolar/hydrophobic fatty acid chains of both layers in the middle.
Although the steroids differ structurally from the other lipids, they are insoluble in water. Steroids include cholesterol, bile salts, Vit. D, and some of the hormones. Lipoid substances include the fat-soluble vitamins, A, E, and K.
PROTEINS
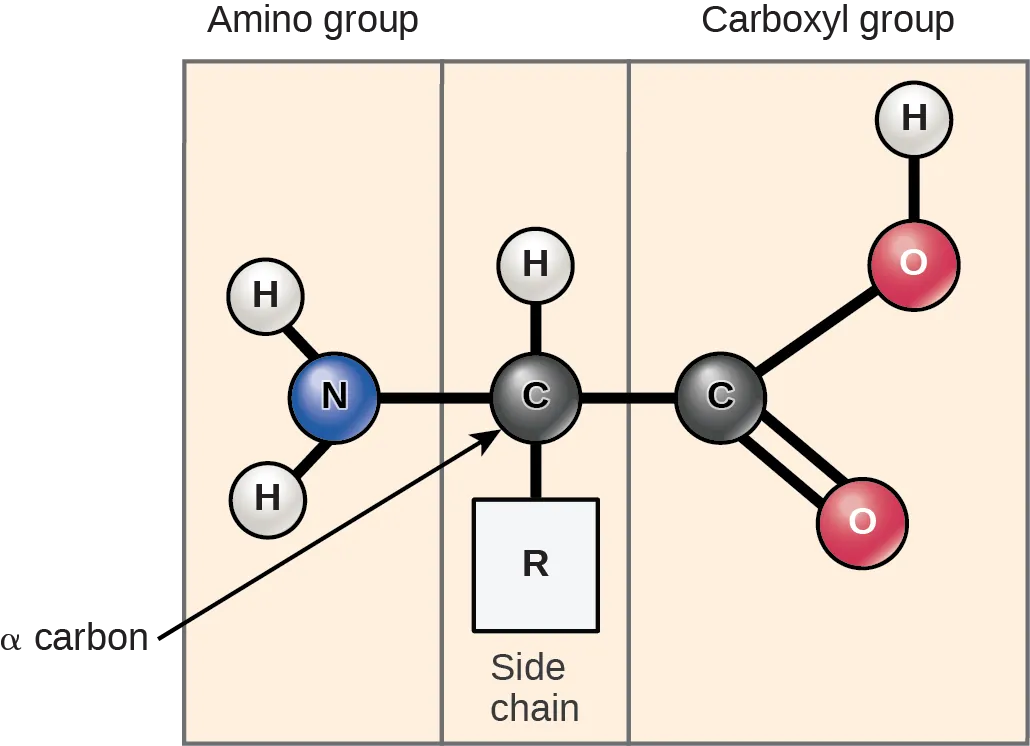
Proteins are another group of organic molecules that are both structurally and functionally important in the human body. The “building blocks” of proteins are amino acids. There are about 20 naturally occurring amino acids. All amino acids contain an amine group (-NH2) and a carboxyl group (-COOH), which is the organic acid group. Each different amino acid also has a specific “R” group (the side chain), making each amino acid unique. These groups determine the many characteristics of amino acids and proteins. Two amino acids can be attached to each other by dehydration synthesis reaction with the removal of a water molecule. The two amino acids are then linked together by a peptide bond. When many amino acids are linked together by peptide bonds it is referred to as a polypeptide chain. Proteins consist of one or more polypeptide chains.
PART 1. Macromolecule testing using known solutions
You will first perform four assays to determine the macromolecules present in the known samples listed below. You’ll predict what sorts of molecules are present, record your observations, and then write conclusions and identify an appropriate positive control. You’ll then use these same four assays to distinguish the four unknown “dairy” products listed below.
| Equipment at Bench | Known Samples | Unknown samples |
| 18 5-mL test tubes | Distilled water | Light whipping cream |
| 2 test tube racks | 1% serum albumin | Whole milk |
| test tube clamp | 6% glucose | Skim milk |
| hot plate | 6% lactose | Soy milk |
| 1 250 mL beaker | 1% starch | |
| round filter papers | Vegetable oil | |
| glass petri dish | ||
| plastic forceps |
Safety guidelines
- Even though we are working with common food items, some of the reagents are harmful. Handle everything with caution and follow all lab safety procedures. Wear gloves and safety goggles during today’s lab.
- Avoid contaminating stock solutions of samples and reagents. Take only what you need and never pour excess back into the stock bottles.
- All solutions containing biuret reagent and Benedict’s reagent will be collected in the AQUEOUS waste container in the hood.
- Sudan Red solution is flammable and thus waste must be poured into a separate FLAMMABLE waste container in the hood. Keep the lids on the waste container closed!
- Take notes about what you observe. The physical properties of many substances (for example, color and viscosity) may provide clues about their identity, in addition to the clues you derive from assays. However, do not smell or taste any of the unknowns.
- If a sample or reagent appears to contain material that has settled or separated, shake the container gently to mix the contents evenly before you use it. The milk samples should be gently shaken before using. Do not shake the Sudan Red bottle!
- Dirty test tubes will interfere with the assays. Thoroughly clean all glassware between assays:
- First, dispose of hazardous waste into its proper container (always double-check!)
o Rinse out each test tube with tap water to remove residue
o Add a small drop of detergent and tap water to each tube
o Scrub tube with a test tube brush
o Rinse each tube with tap water until the soap is gone
o Do three final rinses in distilled water to remove mineral deposits
o Turn upside down in the test tube rack to dry
1A. Biuret Test for Protein
The biuret test detects polypeptides and proteins. The biuret reagent is a blue solution that turns pink/purple in the presence of peptide bonds. In the presence of biuret reagent, solutions containing proteins will turn purple and smaller peptides will yield a pink solution. A solution of amino acids will remain blue since no peptide bonds are present.
- Use a Sharpie to number six test tubes 1-6.
- Use the droppers to add 1 mL of each substance to a numbered test tube, using Table 1 as a guide. Try to get the same volume of sample in each tube.
- As a group, predict whether each sample will give a positive result with the biuret reagent and note this in the table on your worksheet.
- Add 20 drops of biuret reagent (~1 mL) to each tube. Use the vortexer to gently mix each tube.
- Wait two minutes and then record the color of each tube in Table 1. The color may be subtle; hold the tube against a white background to better see the color.
- Under “Conclusion,” use a plus or minus sign to indicate whether protein was present in each tube. You can use one plus sign to represent assay results that were weakly positive, and several plus signs to represent assay results that were strongly positive.
- Pour the tube contents into the AQUEOUS waste container in the hood. Biuret contains copper that must be collected as hazardous waste.
- Remove Sharpie marks from glassware using a paper towel wetted with a small amount of ethanol. Wash the test tubes with soap, rinse with plenty of warm tap water and do three final rinses with distilled water. Shake out remaining water drops and place the tubes upside down in a rack to dry.
Table 1. Biuret Test for Protein
| Tube | Substance | Prediction | Color observed | Conclusion |
| 1 | Distilled water | |||
| 2 | 1% serum albumin | |||
| 3 | 6% glucose | |||
| 4 | 6% lactose | |||
| 5 | 1% starch | |||
| 6 | Vegetable oil |
1B. Benedict’s Test for Reducing Sugars
Benedict’s solution is used to detect the presence of all monosaccharides and some disaccharides. Benedict’s detects ‘reducing sugars,’ which are sugars that can donate electrons to another molecule. In this test, in the presence of reducing sugars and heat, blue cupric ions (Cu++) in the Benedict’s solution are reduced to red cuprous ions (Cu+) or a red copper oxide precipitate (Cu2O), which yields a red-orange color. The table below displays the degrees of a positive reaction:
| Color of reaction | Presence of reducing sugars |
| Brick Red | ++++ |
| Orange | +++ |
| Yellow | ++ |
| Green | + |
| Blue | – (no reducing sugars) |
- Prepare a boiling water bath: Fill a 250-mL beaker about halfway full with distilled water. Place the beaker on a hot plate, cover with a watch glass, and turn the heat all the way up until the water boils. Then, turn the heat down to a point that maintains a gentle boil.
- Use a Sharpie to number the upper ends of 6 test tubes. Use a dropper to add 1 mL of the appropriate solution to a numbered test tube.
- Add your predictions to Table 2 on your worksheet to indicate which samples will give a positive result with the Benedict’s reagent.
- Add 1 mL of Benedict’s reagent to each test tube. Use the vortexer to gently mix the contents of each tube. Record the color of each tube in Table 2 in “Initial color.”
- Place the tubes in the boiling water bath and leave them there for three minutes. Observe carefully! Use the test tube clamp to remove the tubes and return them to a rack. Gently shake each tube to evenly mix the contents (be careful, the tubes will be hot!). Record the color of each tube in Table 2 under “Color after heating.”
- Under “Conclusion,” use plus or minus signs to indicate whether reducing sugar was present in each tube. Use one plus sign to represent assay results that were weakly positive, and several plus signs to represent assay results that were strongly positive.
- Turn off the hot plate, unplug it, and let it cool. When the water bath is cool, pour out the water. Let the test tubes cool, then pour the contents into the AQUEOUS waste container. Benedict’s solution contains copper that must be collected as hazardous waste.
- Remove Sharpie marks from glassware using a paper towel wetted with a small amount of ethanol. Wash the test tubes with soap, rinse with tap water and do three final rinses with distilled water. Shake out drops and place the tubes upside down in a rack to dry.
Table 2. Benedict’s Test for Reducing Sugars
| Tube | Substance | Prediction | Initial color | Color after heating | Conclusion |
| 1 | Distilled water | ||||
| 2 | 1% serum albumin | ||||
| 3 | 6% glucose | ||||
| 4 | 6% lactose | ||||
| 5 | 1% starch | ||||
| 6 | Vegetable oil |
1C. Lugol’s Iodine Test for Starch
An iodine test is used to detect the polysaccharide starch. Lugol’s iodine is a solution of potassium-iodine that has an amber-brown color. When the iodine solution binds to starch, it turns a blue-black color.
- Obtain a ceramic spot plate and label the wells with the labels in Table 3.
- Place one drop of each of the six samples into separate wells.
- Note the initial color of each sample and record it in Table 3.
- As a group, predict whether each sample will give a positive result with the Iodine reagent and note this in Table 3 on your worksheet.
- Add 1 drop of iodine reagent to each well.
- Record the color of each tube in Table 3.
- Under “Conclusion,” use a plus or minus sign to indicate whether starch was present in each tube. You can use one plus sign to represent assay results that were weakly positive, and several plus signs to represent assay results that were strongly positive.
- Wash out the spot plate wells with soapy water. The iodine solution is NOT hazardous waste and can go down the drain. Finish by rinsing the plate with distilled water and leave it drying upside down on your bench.
Table 3. Lugol’s Test for Starch
| Tube | Substance | Prediction | Initial color | Final color | Conclusion |
| 1 | Distilled water | ||||
| 2 | 1% serum albumin | ||||
| 3 | 6% glucose | ||||
| 4 | 6% lactose | ||||
| 5 | 1% starch | ||||
| 6 | Vegetable oil |
1D. Sudan Red Test for Lipid
The Sudan IV dye is dark red-brown powder that is insoluble in water and therefore is dissolved in alcohol (FLAMMABLE). When Sudan dye binds to fats it will turn a bright red color. Be very careful not to get the dye solution on your clothing, skin, or eyes.
- Use a pencil (not ink) to write the numbers 1–6 around the edge of the filter paper.
- Place a SMALL, single drop of each substance next the corresponding number, using Table 4 as a guide. Make sure your samples do not overlap each other.
- Hold the filter paper in the air and use the hair dryer (low-power, held ~ 6 inches from the paper) to blow air at the paper until the spots are dry.
- As a group, predict whether each sample will give a positive result with Sudan red dye and note this in Table 4 of your worksheet.
- Wear gloves and eye protection for this step. Place the filter paper in a round glass dish, then IN THE HOOD add 2.5 mL of Sudan Red solution to cover it (if the reagent bottle contains sediment, avoid disturbing it). Let the glass dish sit in the hood for 5 minutes, with occasional swirling.
- Wearing gloves, pour off any excess dye into the FLAMMABLE waste container.
- In the hood, use the water squeeze bottle to rinse the filter paper with a small amount of water (~5 mL). Pour the filter rinse waste into the AQUEOUS waste container.
- Take your glass plate containing the filter paper to the hairdryer. Pick up the filter paper with plastic forceps and use the hair dryer to dry the filter paper. Hold the paper against a white background to look for pink spots. Record the color of each spot in Table 4 on your worksheet.
- Under “Conclusion,” use a plus or minus sign to indicate whether lipids were present in each spot. You can use one plus sign to represent assay results that were weakly positive, and several plus signs to represent assay results that were strongly positive.
- Use the forceps to dispose of the filter paper in the labeled Ziploc bag in the hood.
- Wash the glass dish with soap and rinse with plenty of warm tap water. Do a final rinse with distilled water. Invert the dish and let it air dry.
Table 4. Sudan Red Test for Lipid
| Tube | Substance | Prediction | Color after staining | Conclusion |
| 1 | Distilled water | |||
| 2 | 1% serum albumin | |||
| 3 | 6% glucose | |||
| 4 | 6% lactose | |||
| 5 | 1% starch | |||
| 6 | Vegetable oil |
PART 2. DESIGNING AN EXPERIMENT
Your group’s goal is to design and carry out an experiment to distinguish four types of “milk” products: whole milk, skim milk, cream, and nondairy soy milk. You will be given samples of each of the four substances, identified by code numbers. You may use any of the four assays (biuret test, Benedict’s test, Lugol’s test, Sudan red test).
- Use the table to indicate the types of macromolecules (and their relative amounts) that you expect to be present in each of the four substances:
| protein | reducing sugar | starch | lipid | |
| whole milk | ||||
| skim milk | ||||
| cream | ||||
| soymilk |
- Discuss which assays will detect those macromolecules that are present or absent in the four samples. (Hint: keep in mind that some assays are semi-quantitative, so you may be able to assess the relative amounts of some macromolecules in the four substances.)
- Decide which TWO assays to run. Justify why you believe those two assays are the BEST ones to distinguish these solutions.
- Carry out the assays, following the procedures given in Part 1. For each assay, you should include a positive and a negative control. Be sure to gently shake the milk samples before using them. Construct tables for the results of each assay, showing the 4 milk samples (identified by code) and the controls.
- Compare the assay results with the predictions you made in Step 1, and identify the four samples on your worksheet. If you are not sure of the results, we will compile our class results. For the post-lab assignment, you will discuss whether your experiment was successful, or if not, what went wrong and how you might fix it.
- Dispose of the test tube or spot plate contents (in sink or waste container, as appropriate) and wash the test tubes.
-
- Remove all sharpie marks from glassware.
- Make sure all the glassware has been properly cleaned and is placed upside-down to drip dry.
- Arrange all equipment and other supplies neatly for the next lab group.
- Wipe down your entire table with bench cleaner.
